

Key Takeaways
- To create an Amazon Storefront, you need a Professional Seller account, an active trademark, and enrollment in Amazon Brand Registry. Individual seller accounts are not eligible.
- The 5 steps to build your storefront are: access the Store Builder, set up your brand identity, plan and build your pages, add your products, and design and submit for review.
- Storefront review typically takes 24 to 72 hours. Once approved, you receive a unique Storefront URL you can use in Sponsored Brands ads, social media, email campaigns, and packaging.
- Design decisions matter: mobile optimization, high-resolution images, and customer-focused page structure directly affect whether your Storefront converts visitors into buyers.
- A well-built Storefront removes competitor ads from the customer experience, giving your brand full control over the shopper journey.
If you are a brand selling on Amazon, your product listings are not enough on their own. Individual listings are competitive spaces where Amazon places competitor ads, sponsored placements, and comparison widgets right next to your products. You have limited control over the experience a shopper has once they land on your listing.
An Amazon Storefront changes that. It gives your brand a dedicated, multi-page space inside Amazon where you control the layout, the imagery, the product organization, and the shopping experience from start to finish.
This guide walks you through everything you need to know: who qualifies to build an Amazon storefront, what you need to get started, and exactly how to create an Amazon Storefront in 5 clear steps.
Who Can Create an Amazon Storefront?
Not every Amazon seller can build a Storefront. Amazon restricts this feature to verified brand owners who meet specific requirements.
- Third-Party Sellers (3P) on Seller Central: Brand-registered sellers with a Professional Seller account can create an Amazon Storefront. This is the most common path for independent brands and private label sellers.
- Vendors on Vendor Central: First-party vendors who supply products directly to Amazon can also access the Storefront builder through Vendor Central.
- Amazon Brand Registry Enrollment is Required for Both: Regardless of whether you sell as a 3P seller or a 1P vendor, you must be enrolled in Amazon Brand Registry to access the Storefront feature. Enrollment is tied to trademark ownership, which is covered in the next section.
What You Need Before You Start
Before you log into the Store Builder, make sure you have the following in place. Trying to set up an Amazon Storefront without these will stop you before you get started.
A Professional Seller Account
Individual Amazon seller accounts, the free tier, do not include access to Storefront features. You need a Professional Seller account, which costs $39.99 per month and includes access to all Brand Registry tools, including the Storefront builder.
If you are currently on an Individual account, you can upgrade to Professional directly in Seller Central under Account Info. The upgrade takes effect immediately.
Amazon Brand Registry Enrollment
This is the most important requirement. Amazon Brand Registry is a program that verifies brand ownership and gives enrolled brands access to advanced tools, including A+ Content, Sponsored Brands advertising, and the Storefront builder.
To enroll in Amazon Brand Registry, you need:
- A Registered or Pending Trademark: Your brand name or logo must have an active registered trademark or a pending trademark application with an approved intellectual property office. In the United States, this is the USPTO. In Australia, it is IP Australia. Amazon accepts trademarks from most major trademark offices globally.
- Proof of Trademark Ownership: You must be able to verify that you are the trademark owner or an authorized representative. Amazon will check this during the enrollment process.
- An Active Amazon Account: You enroll using your existing Seller Central or Vendor Central credentials.
The Brand Registry enrollment process typically takes a few days once your trademark is verified. If you have a pending trademark rather than a registered one, Amazon accepts this but may require additional verification steps.
Active Product Listings
Technically, you can begin building a Storefront before your listings are live. However, there is no practical reason to do so. Your Storefront exists to showcase and sell products. You need live ASINs to add to your product pages. Before you start building, ensure your core product listings are published and active on Amazon.
The Cost to Create an Amazon Storefront
Creating and hosting an Amazon Storefront is free. There is no additional fee beyond your existing Professional Seller account subscription ($39.99/month). You can build as many pages as you need, upload as many images as you want, and make unlimited edits to your store at no extra cost.
How to Create an Amazon Storefront in 5 Simple Steps
Once your Professional Seller account is active and your Brand Registry enrollment is confirmed, you are ready to start building. Here is exactly how to set up an Amazon Storefront from scratch.
Step 1: Access the Store Builder
Log in to your Amazon Seller Central account at sellercentral.amazon.com.
In the top navigation menu, hover over the Stores tab and click Manage Stores from the dropdown. This will show you any existing stores tied to your account. If this is your first Storefront, the page will prompt you to create a new store.
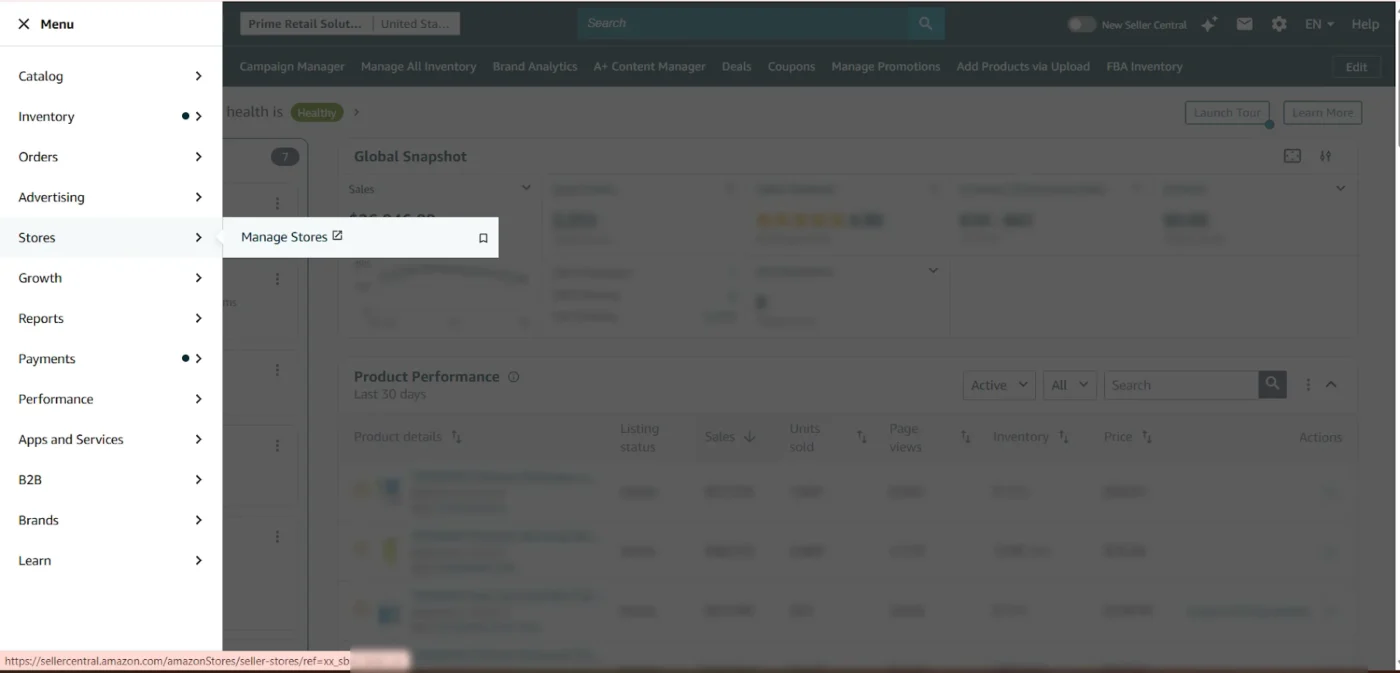
Click Create Store and select your brand from the list of Brand Registry-enrolled brands associated with your account. If you manage multiple brands, make sure you are selecting the correct one before proceeding.
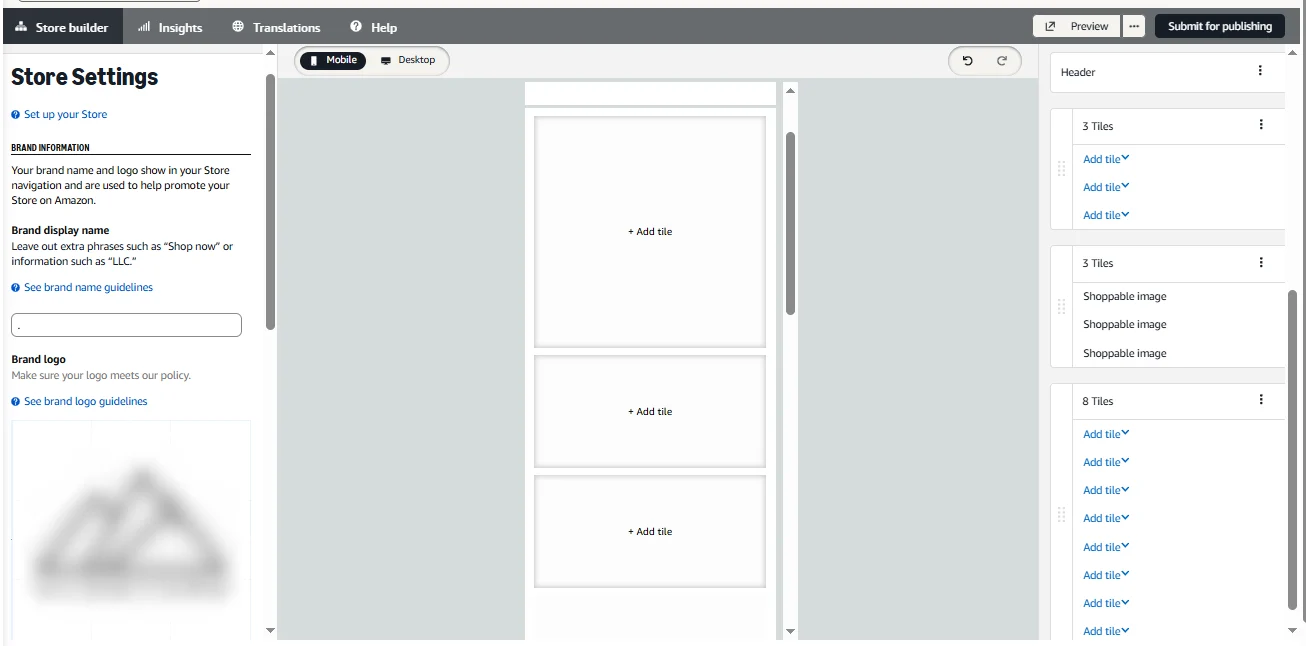
You will now be inside the Amazon Store Builder, which is a drag-and-drop interface that does not require any coding or design software knowledge. Everything is built visually using tiles, templates, and modules.
Step 2: Set Up Your Brand Identity
Before you start building pages, Amazon asks you to configure the basic elements of your brand identity within the store.
- Brand Display Name: Enter your brand name exactly as you want it to appear to shoppers. This should match your Brand Registry name and trademark.
- Brand Logo: Upload your brand logo. Amazon recommends a PNG file with a transparent background, minimum 400 x 400 pixels. Your logo appears in your Storefront header and helps establish brand recognition immediately when a shopper lands on your page.
- Brand Header Image: This is the large banner image at the top of your Storefront homepage. It is the first visual impression shoppers get of your brand. Use a high-quality lifestyle image or branded graphic that reflects your product range and brand aesthetic. Minimum dimensions are 3000 x 600 pixels. Amazon will reject blurry or pixelated header images during review.
Take time on this step. Your brand identity elements appear consistently across all pages of your Storefront and set the visual tone for everything else.
Step 3: Plan and Build Your Pages
This is the most strategic step in the process. Before you start dragging and dropping tiles, think about your page structure. A well-planned Storefront navigation makes it easy for shoppers to find what they are looking for and encourages them to explore more of your catalog.
- The Homepage: Your homepage is your Storefront’s landing page. Every shopper who visits your store arrives here first. Use it to give an overview of your brand, highlight your bestsellers or featured products, and direct shoppers toward your category pages. Do not try to show every product on the homepage. Curate it.
- Category Pages: Add sub-pages for each major product category or collection in your range. A home goods brand might have pages for kitchen, bedroom, and bathroom. A supplement brand might organize by health goal. Build pages the way your customers think about your products, not the way your catalog is organized internally.
- Product-Specific Pages (Optional): For hero products or new launches, a dedicated product page inside your Storefront gives you space to tell a fuller story than a standard listing allows. This is useful for complex products that benefit from additional explanation, comparison charts, or lifestyle context.
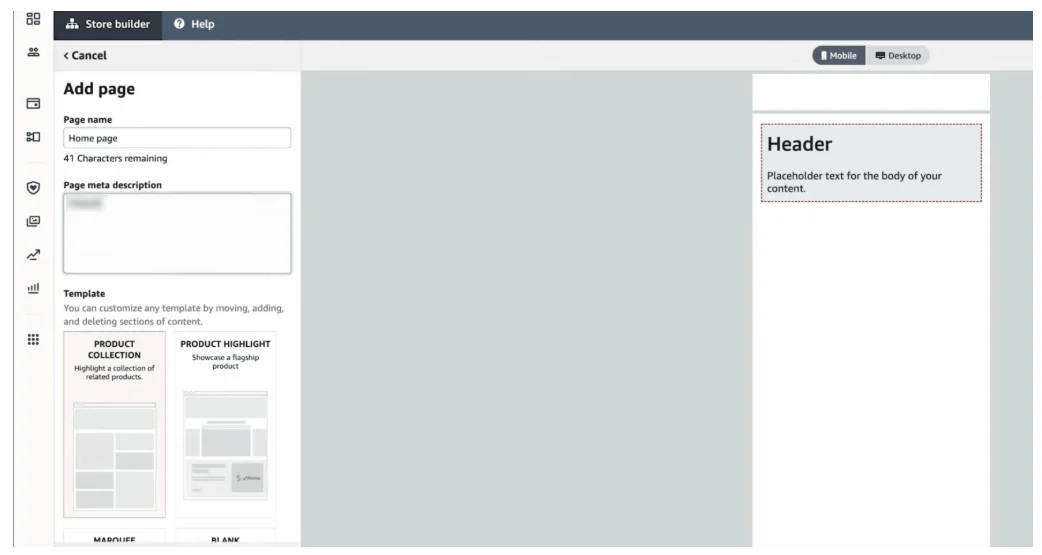
To add a page, click Add Page inside the Store Builder, give it a name, choose a template (or start from scratch), and begin adding content tiles. Amazon provides pre-built templates for common page types, which are a useful starting point if you are building your first Storefront.
Step 4: Add Your Products
With your pages built, you now add the actual products shoppers will browse and buy.
The primary tool for adding products is the Product Grid tile, which displays multiple ASINs in a formatted grid layout. You can also use individual Product tiles for featuring specific items with more visual prominence.
To add products to a grid:
- Select the Product Grid tile from the tile menu and place it on your page
- Click Add Products inside the tile
- Search for your ASINs by product name, ASIN, or keyword
- Select the products you want to include and confirm
Amazon automatically pulls the product image, title, price, and star rating from your existing listing. You do not need to re-enter product information manually.
A few practical guidelines for product selection:
- Keep your product grids focused. A grid with 4 to 8 products per page tends to perform better than one with 20 or more. Overwhelming shoppers with options reduces the likelihood that they click on anything.
- Feature your bestsellers and highest-reviewed products first. Shoppers who arrive at your Storefront via Sponsored Brands ads or your Storefront URL are already somewhat interested in your brand. Lead with the products most likely to convert.
- Use category pages to organize products by type so shoppers can self-select into the most relevant part of your catalog. This is more effective than placing every product on the homepage.
Step 5: Design Your Storefront and Submit for Review
With your pages built and products added, the final step is to complete the design of your Storefront and submit it to Amazon for review.
- Image Tiles: Use image tiles to add lifestyle photography, branded graphics, and visual storytelling between product grids. These are what give your Storefront a branded feel rather than looking like a plain product list. Use high-resolution images (at least 1500 pixels wide) and make sure every image is relevant to the products or collection it sits alongside.
- Text Tiles: Use text tiles sparingly and with purpose. A short headline above a product grid, a one or two-sentence brand description on the homepage, or a benefit-focused callout above a featured product. Keep text concise. Shoppers on Amazon are in buying mode, not reading mode.
- Video Tiles: If you have product video content, the video tile is one of the highest-impact elements available in the Store Builder. A short product demonstration or brand story video placed prominently on your homepage or a hero product page, can significantly increase engagement and time spent on your Storefront.
- Background Content: Amazon allows you to set background images or colors for sections of your page. Use this to create visual separation between sections and to reinforce your brand color palette.
Once you are satisfied with your design, click Submit for Publishing in the Store Builder. Amazon’s moderation team will review your Storefront to ensure it complies with their content policies. This typically takes 24 to 72 hours. You will receive a notification when your Storefront is approved and live. At that point, your store is accessible via a unique Amazon URL in the format: amazon.com/stores/YourBrandName.
Building a Storefront is easy; building one that drives engagement and sales requires strategy. A full service Amazon agency can help you create a Storefront that aligns with your brand, showcases your products effectively, and supports your long-term growth.
Amazon Storefront Design Best Practices
Knowing how to start an Amazon Storefront is the first step. Knowing how to make it perform is what actually drives results. Once your store is live, the next priority is Amazon storefront optimization, refining page structure, updating creative, and connecting your store to advertising campaigns to maximize traffic and conversion over time. These design principles separate Storefronts that convert from ones that sit idle.
Use High-Resolution Images That Reflect Your Brand
Image quality is the single biggest factor in whether a Storefront looks professional or amateur. Blurry images, inconsistent photography styles, and stock photos that do not reflect your actual products create an immediate trust deficit.
Every image on your Storefront should be high-resolution, well-lit, and visually consistent with your brand aesthetic. If your brand is premium, your imagery needs to communicate that. If your brand is lifestyle-focused, your photography should show your products in context, in use, in the environment your customers aspire to.
Invest in professional product photography before building your Storefront. The images you upload here are often the first and clearest brand impression a shopper gets of your business.
Build Pages Around How Customers Shop
The most common mistake brands make when building a Storefront is organizing it around internal logic rather than customer logic. They create pages that mirror their product catalog structure: SKU groups, internal categories, or manufacturing lines.
Shoppers do not think this way. They think about their problems and goals. Organize your Storefront pages around what shoppers are trying to accomplish or find. A pet brand should not have pages called “Product Line A” and “Product Line B.” They should have pages called “Dogs,” “Cats,” and “Bundles.”
Ask yourself: if a shopper knew nothing about my brand and arrived on this Storefront for the first time, would they immediately understand where to go to find what they need? If the answer is no, restructure your navigation.
Storefront structure is one layer of Amazon conversion rate optimization, alongside listing images, pricing, and review count. The way you organize your Storefront navigation directly affects whether browsers become buyers.
Use Video Tiles for Hero Products
Video content on Amazon Storefronts consistently outperforms static images in terms of engagement and time spent on page. If you have a product that benefits from demonstration or that has a story worth telling in motion, the video tile is where to use it.
Keep Storefront videos short and front-loaded with value. The first 3 to 5 seconds should immediately show the product or communicate its key benefit. Shoppers scrolling through a Storefront will not wait for a slow build. Hook them fast, or they scroll past.
For brands without a dedicated brand video, a well-edited product demonstration video between 15 and 60 seconds is more effective than a longer brand story video. Show the product working. Show the result. That is what converts.
Write Headlines That Sell, Not Just Describe
The text tiles and headlines across your Storefront are not decorations. They are selling tools. Most brands waste them with generic phrases like “Shop Our Collection” or “Quality Products for Every Need.” These headlines say nothing and do nothing.
Write headlines that communicate specific value to the shopper. Instead of “Shop Supplements,” write “Build Your Recovery Stack.” Instead of “Our Products,” write “Skincare Built for Sensitive Skin.” Instead of “Welcome to Our Store,” write “Free Shipping on Orders Over $35.”
Every headline should answer the shopper’s implicit question: why should I pay attention to this?
Optimize for Mobile
The majority of Amazon shoppers browse and buy on mobile devices. This means your Storefront design must work on a small screen, not just a desktop monitor.
The Amazon Store Builder shows you a mobile preview of every page as you build it. Use it. Check it constantly. Images that look proportionate on a desktop often get cropped awkwardly on mobile. Text that is readable at full screen becomes too small on a phone. Product grids with four columns on desktop collapse to two columns on mobile, which changes the entire visual layout.
Design with mobile as the primary view, not an afterthought. A Storefront that looks great on desktop but breaks on mobile is losing the majority of its potential traffic.
Conclusion
Creating an Amazon Storefront is one of the most effective ways to strengthen your brand presence on Amazon. It gives shoppers a dedicated space to explore your products, understand your brand story, and move through a buying experience designed around your business rather than competing listings.
The process itself is straightforward, but building a Storefront that drives engagement and sales requires thoughtful planning, strong visual design, and a clear understanding of shopper behavior. The most successful brands treat their Storefront as a core part of their Amazon growth strategy, connecting it with advertising campaigns, product launches, and brand-building efforts.
AMZDUDES, a full service Amazon agency, helps brands create high-converting Amazon Storefronts that do more than look good. Our Amazon Storefront Design Services combine strategic page architecture, custom creative, brand storytelling, and advertising integration to create a seamless shopping experience. Whether you’re launching your first Storefront or optimizing an existing one, we help turn your Storefront into a revenue-generating asset that supports long-term Amazon growth.
Book a free consultation with AMZDUDES today!
Frequently Asked Questions
What is an Amazon Storefront?
An Amazon Storefront is a free, multi-page brand destination inside the Amazon marketplace. It gives brand-registered sellers a dedicated space to showcase their full product catalog, tell their brand story, and create a curated shopping experience for customers. Unlike standard product listings, a Storefront contains no competitor ads and gives the brand full control over layout, imagery, and product organization.
How much does it cost to create an Amazon Storefront?
Creating an Amazon Storefront is free. There is no additional cost beyond your existing Professional Seller account ($39.99/month). Building pages, adding products, uploading images, and editing your store can all be done at no extra charge. Optional costs include advertising spend to drive traffic to your Storefront and any external design or content production work.
How long does it take for an Amazon Storefront to get approved?
Once you submit your Storefront for review, Amazon’s moderation team typically takes 24 to 72 hours to approve it. During review, Amazon checks that your content complies with their policies, including image quality standards, prohibited content rules, and accurate product representation. You will receive an email notification when your store is approved and live.
Can I create an Amazon Storefront without Brand Registry?
No. Amazon Brand Registry enrollment is required to access the Storefront builder. Brand Registry requires an active or pending trademark for your brand. If you do not yet have a trademark, you will need to apply for one before you can enroll in Brand Registry and create a Storefront.
How do I get traffic to my Amazon Storefront?
Your Storefront URL can be used anywhere you communicate with customers: Sponsored Brands campaigns (which are one of the most effective ways to drive qualified traffic directly to your store), social media posts, email marketing, influencer partnerships, and even printed packaging. Inside Amazon, Sponsored Brands headline ads and video ads allow you to link directly to your Storefront or to specific pages within it.
Can I have multiple pages in my Amazon Storefront?
Yes. The Amazon Store Builder supports multi-page Storefronts with a homepage and as many sub-pages as you need. Most brands build category pages, collection pages, or product-specific pages in addition to the main homepage. There is no limit on the number of pages you can create.
What happens if my Storefront gets rejected during review?
Amazon will notify you of the rejection and provide a reason. Common rejection reasons include low-resolution images, content that violates Amazon’s policies (such as pricing claims, off-Amazon URLs, or misleading product descriptions), or a header image that does not meet minimum dimensions. Fix the flagged issue and resubmit. The review process starts again from the point of resubmission.
Can I edit my Amazon Storefront after it goes live?
Yes. You can edit your Storefront at any time using the Store Builder. Changes go through a review process before going live, which typically takes 24 to 72 hours. You can make as many edits as you need, and your existing live Storefront remains visible to shoppers while the updated version is under review.
Does an Amazon Storefront help with SEO?
Your Amazon Storefront is indexed by Amazon’s internal search and can appear in Amazon search results for branded queries. It is also indexable by Google, meaning a well-built Storefront with relevant content can appear in external search results for branded searches. This makes your Storefront a useful asset not just for shoppers already on Amazon but for anyone searching for your brand online.