

Key Takeaways
- GS1 Compliance Is Essential: Amazon now cross-checks every barcode against the GS1 database. Using non-GS1 codes risks suppression or removal, switching to GS1 is no longer optional.
- Follow a Proven 8-Step Process: The guide walks you through verifying barcodes, creating GS1 listings, and merging ASINs — ensuring a smooth transition without losing sales or reviews.
- Avoid Critical Mistakes: Don’t overwrite UPCs, delete listings before merging, or reuse GS1 codes. These errors can permanently affect rankings and reviews.
- Always Have a Backup Plan: If merges fail, use manual UPC updates, Brand Registry escalation, or recreate listings under GS1 UPCs to stay compliant.
- Keep Documentation Organized: Save your GS1 certificate, prefix invoice, mapping sheet, and case IDs — they’re vital for audits or catalog reviews.
- Future-Proof Your Brand: Moving early to GS1 protects listings, strengthens authenticity, and builds long-term marketplace trust.
- Get Expert Help When Needed: If you’re unsure, the AMZDUDES team can handle the transition for you — keeping your listings live and fully compliant.
Amazon has started taking action against product listings that use unauthorized or non-GS1 barcodes. GS1 barcode is a globally unique, brand-traceable identifier issued by Global Standards One organization. This organization issues and manages Universal Product Codes (UPCs) all across the globe. As of the 2025 Amazon GS1 barcode policy, if you are purchasing barcodes from third-party barcodes sellers instead of directly getting them from GS1, Amazon will soon remove or suspend your listing.
This has made having an Amazon GS1 barcode for your product listings non-negotiable as Amazon cross-verifies every code against the official GS1 database. So, as an Amazon seller, you need to change your Amazon Listing Barcodes from Non-GS1 Barcode to GS1 Barcode and then merge Amazon listings with UPC. By doing so you will be able to protect your product listings from removal of suspension.
This blog will acknowledge you with all the steps you need to take to change your Amazon listing barcodes from non-GS1 to GS1 barcodes. Follow this to mark your Amazon listings safe from Amazon’s barcode crackdown.
How to Change Existing Barcode to Amazon GS1 Barcode: Step-by-Step Process
To change the existing barcode to Amazon GS1 barcodes, Amazon sellers need to follow a 6 steps process. Below, you can find the step-by-step process in detail:
Step 1: Download Your Inventory Report
Before making any updates, you first need a clear picture of your current barcodes for Amazon listings. In order to look into this, you need to download your full inventory report directly from Seller Central.
To download it, login in to “Amazon Seller Central” and you can find the “Reports” tab right above the “Payments” tab. There, select the “Inventory Reports” and then click on “Category Listings Report”.

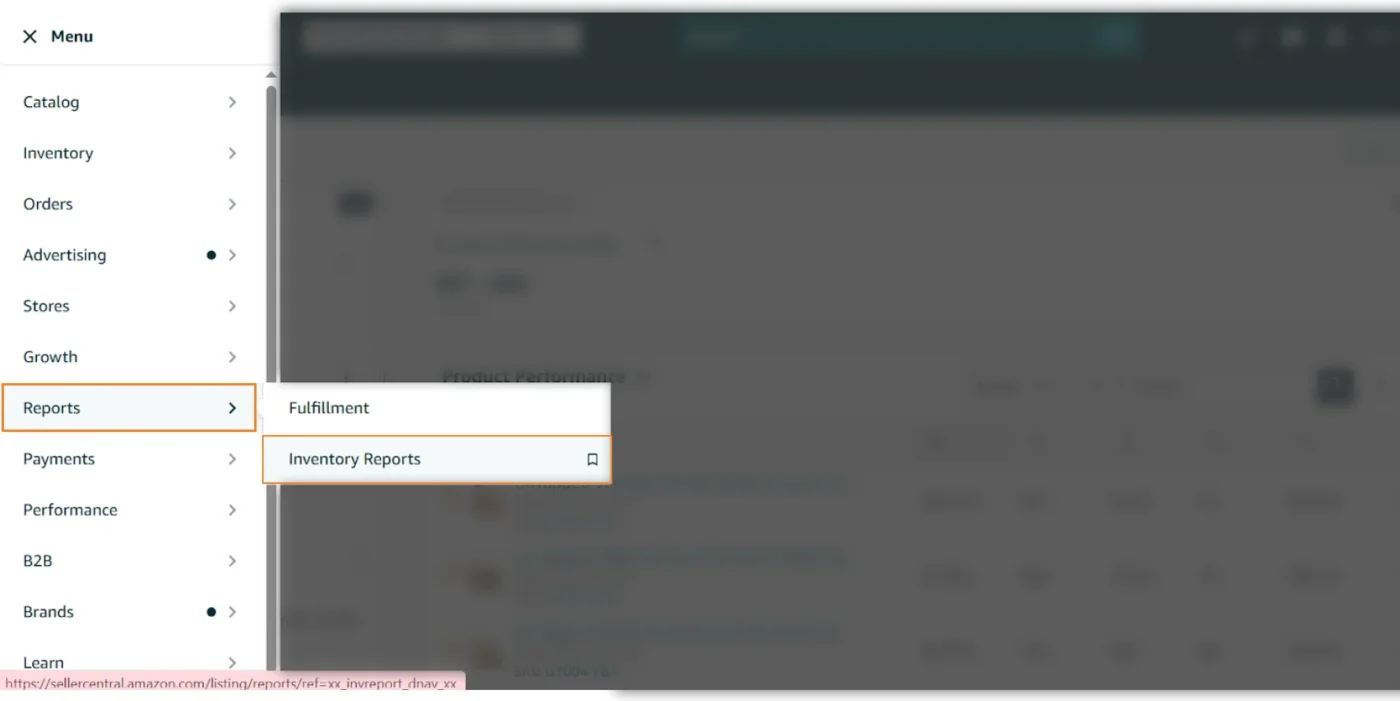


After clicking on “Request Report”, wait for a few minutes as generating a report might take a bit of time. Once done, download the file in .CSV format.
This report contains critical columns such as ASIN, SKU, Product ID (UPC), and Brand Name. These data points will help you identify which listings are using non-GS1 barcodes. Once downloaded, save this file as your master tracking document. Label it something like “GS1 Transition Tracker – [Month-Year]”. You’ll refer to this file throughout the migration process, it becomes your blueprint for barcode validation, mapping, and eventual merge tracking.
As by now, you have all your ASINs and UPCs centralized, you’ll reduce errors, speed up validation, and maintain clarity across large catalogs or multi-market accounts.
Step 2: Verify If Your Current Barcodes Are Compliant to Amazon GS1 Barcode Policy
Now that you have your active listings file, the next step is to confirm which barcodes are legitimate and registered under your brand in the GS1 database.
- Visit GS1.org
- Use the “Check Company Prefix” lookup tool.
- Enter your UPC or company prefix from the Active Listings report.
The system will display the registered company name associated with that code. If your brand name appears, you have an Amazon GS1 barcode for that product. If not, or if it shows a different company name, you need to get a GS1 barcode for Amazon.
- Return to your spreadsheet and add a new column titled “GS1 Verified / Non-GS1.”
| ASIN | SKU | Current UPC | GS1 Status |
| B0XXXXXX | SKU-101 | 012345678901 | Non-GS1 |
| B0YYYYYY | SKU-102 | 085678900123 | GS1 Verified |
Highlight the non-GS1 entries so that you can identify which of the listings requires Amazon GS1 barcode. This distinction is vital when submitting support cases later, as Amazon may request your GS1 prefix certificate to validate ownership.
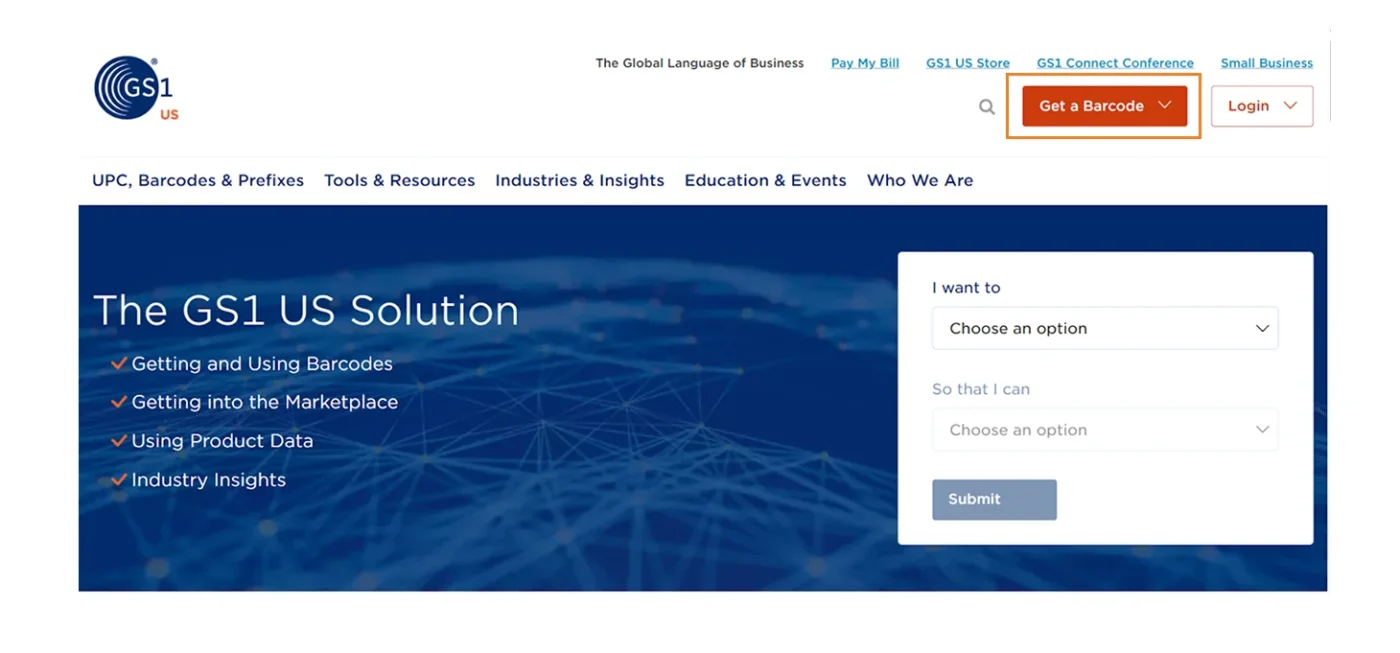
Step 3: Purchase Official Amazon GS1 Barcode
Once you know which products need a GS1 barcode for Amazon, the next step is to obtain an authentic one directly from GS1 as it’s the only source recognized by Amazon. In order to get one, you need to:
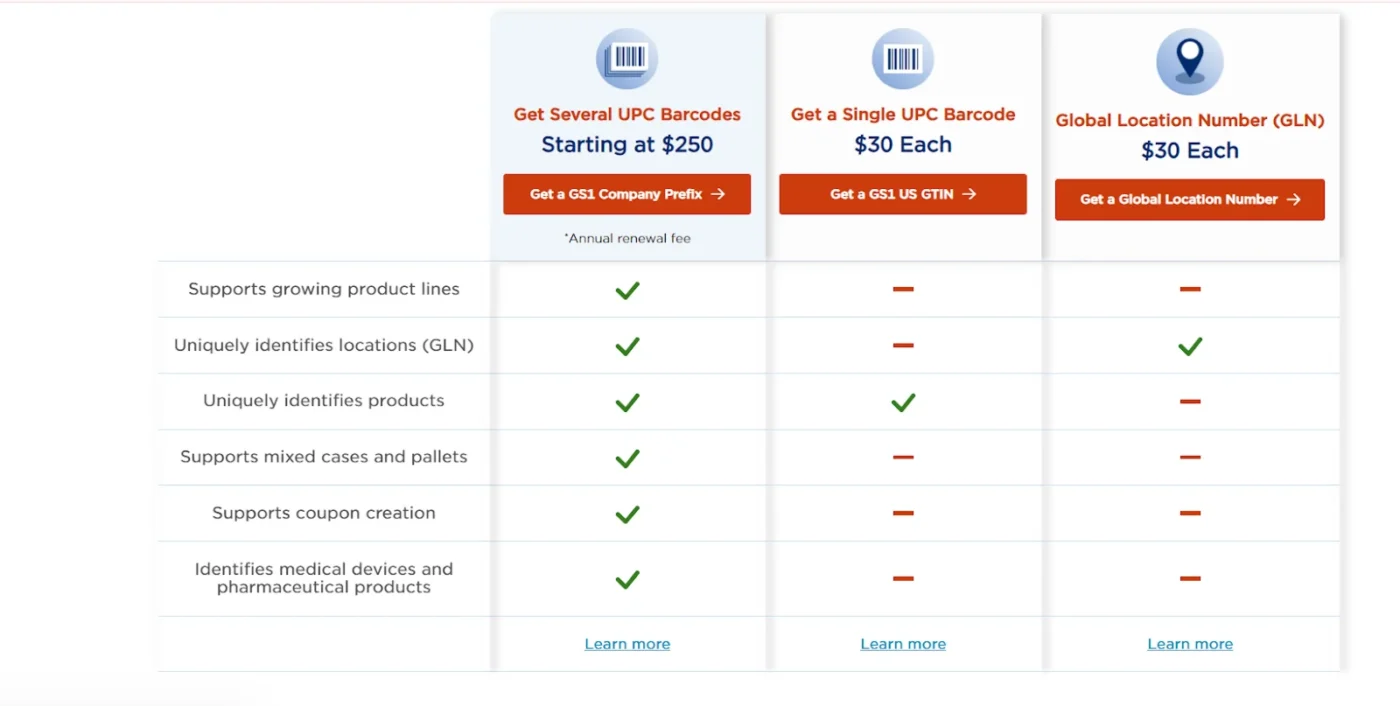
- Visit your regional GS1 website such as GS1 US, GS1 UK, or your local member organization.
- Select the plan that fits your catalog size. Small sellers can purchase single UPCs, while established brands typically obtain a Company Prefix license for multiple barcodes.
Complete your registration, ensuring your business name exactly matches your Amazon Brand Registry details.
After purchase, GS1 will issue a Company Prefix Certificate and this document officially links your UPCs to your business. Save this certificate as a PDF, as Amazon often requires it for verification when you merge Amazon listings.
Each unique product variant (such as color, size, or pack count) must receive its own GS1 barcodes for Amazon UPC. If you attempt to use one Amazon GS1 barcode multiple times, you are clearly violating the GS1 standards and may trigger errors within Amazon’s system.
- To stay organized, prepare a mapping spreadsheet like this:
| Old UPC | New GS1 UPC | ASIN | SKU | Notes |
| 012345678901 | 085678900123 | B0ABC123 | SKU-001 | Replace reseller barcode |
| 023456789012 | 085678900123 | B0DEF456 | SKU-002 | Assign new GS1 code |
This tracking file will help you keep a check on accuracy when creating new listings or requesting Amazon merge listings later in the process.
Step 4: Create a New Listing Using the Amazon GS1 Barcode
Amazon does not allow sellers to simply overwrite an existing UPC in the Manage Inventory interface. To stay compliant, you’ll create a new GS1-verified listing through a controlled flat-file process, then merge it with your original product later.
Step 4.1: Open and Filter Your Category Listing Report
- Open the downloaded All Listings Report in Excel and click the Filter icon on the header row.
- Filter the SKU column for the exact product you plan to correct.
- Delete or hide all other rows and leave only that single SKU visible.
- You should now have a file containing just one product which is your target listing.
Step 4.2: Edit the Listing Fields for GS1 Compliance
In that single visible row:
- Change the SKU to a brand-new identifier (e.g., from ABC-123 to XYZ-789).
- Enter your new 12-digit GS1 UPC under Product ID. Set Product ID Type = “UPC.”

- Confirm all core data (title, bullets, description, brand, dimensions, and images) matches the existing listing exactly.
- This new SKU with a GS1 UPC will serve as your compliant version.
Save the edited report as a fresh CSV file and this is the file you’ll re-upload to create the new ASIN.
Step 5: Upload the Edited Report to Create Your New Listing
Once you are done with editing, it’s time to upload the corrected file to Amazon so it can generate the new product tied to your Amazon GS1 barcode. To do so, you need to:
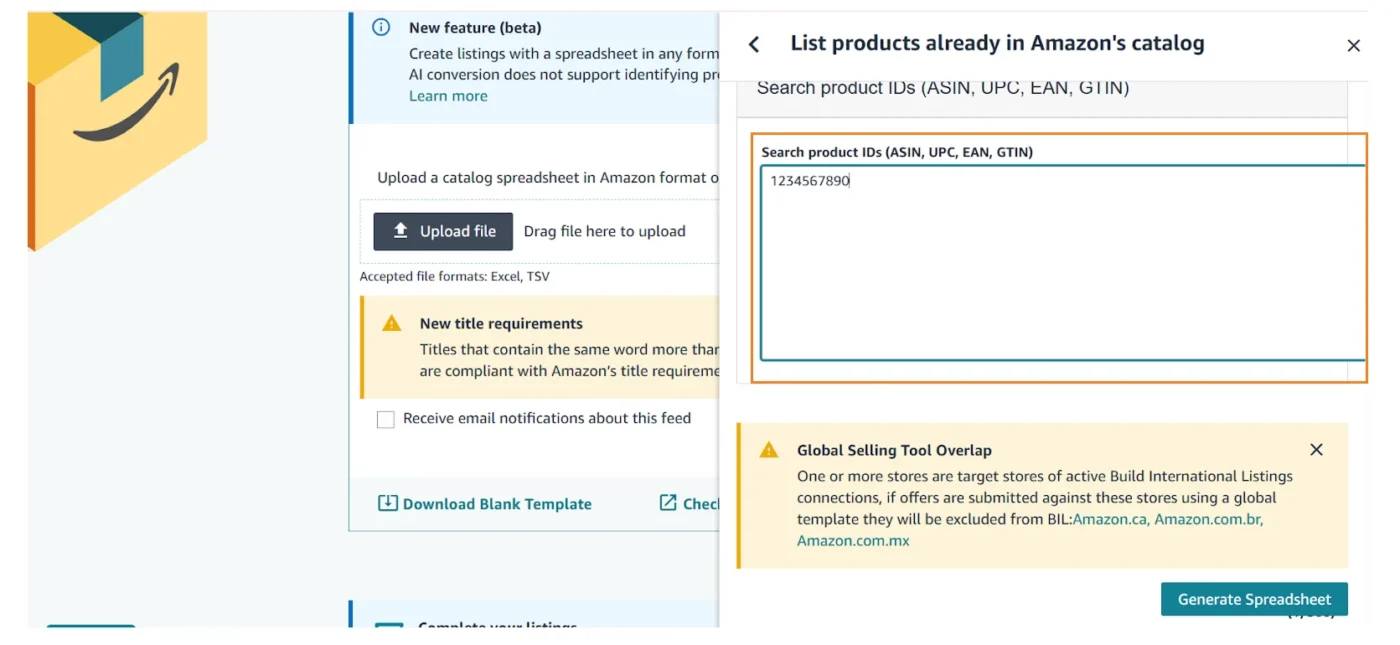
- Login “Seller Central”, hover over “Catalog” and select “Add Products via Upload”.
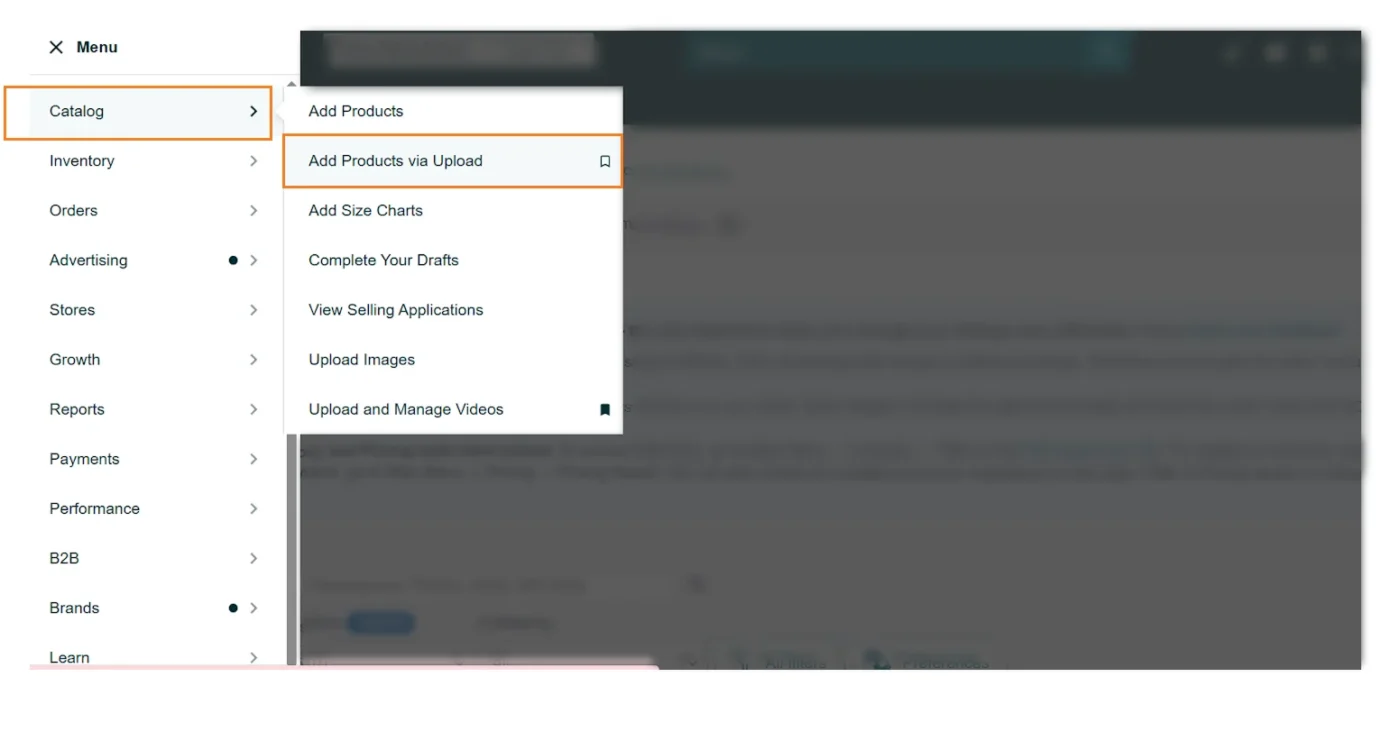
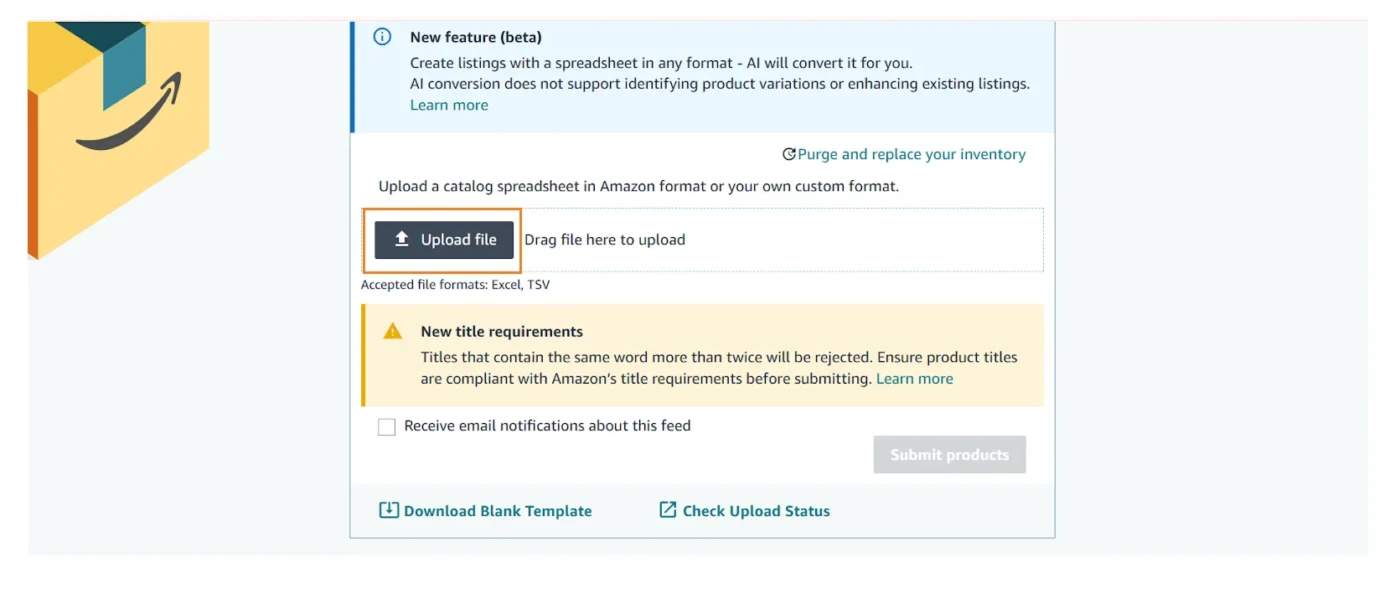
- Under “Upload Your Inventory File,” select List Products Already in Amazon’s Catalog”.
- Search for the Product ID that you want to replace, generate the pre-filled sheet, and update with the new Amazon GS1 barcode.
- After updating the file with the Amazon GS1 barcode details, click “Choose File” and upload the edited CSV you just saved (with only one SKU).
- Double-check that the file name and data correspond to your GS1 listing, then click Upload.
Amazon will begin processing the file and create a new product detail page using your GS1 UPC.
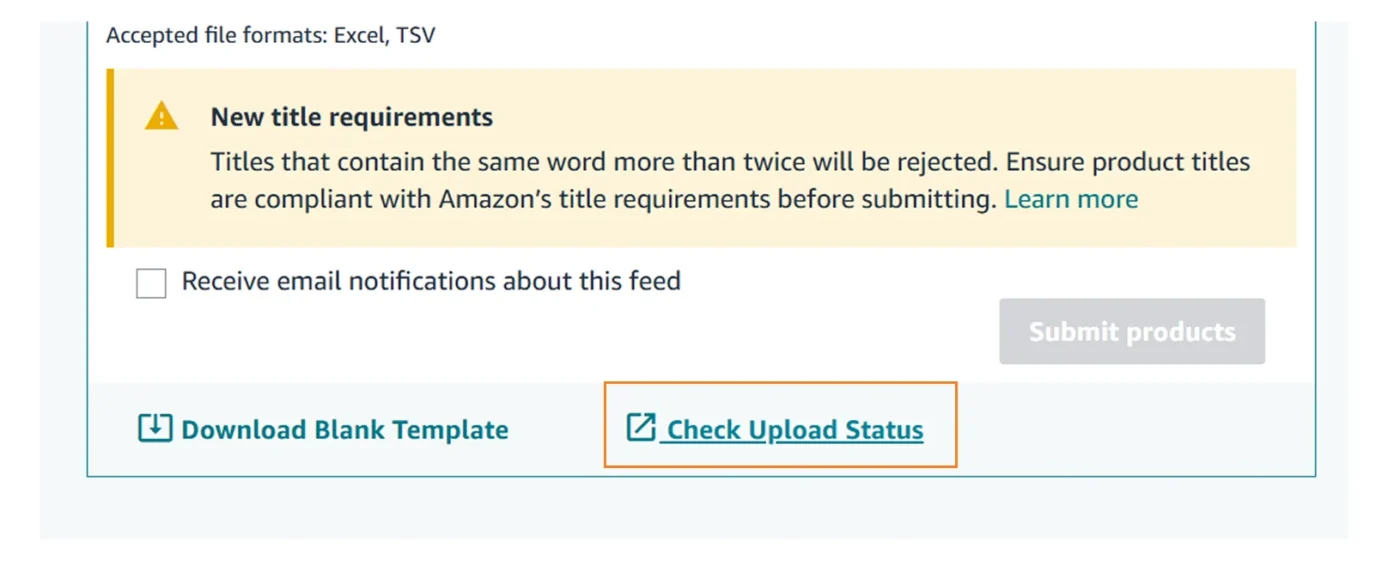
- Monitor the upload status carefully by clicking on “Monitor Upload Status” and then select “Processing Report” to view results.
Troubleshooting Upload Errors
If errors appear, read each message in the Processing Report. Here’s how you can comprehend the errors:
- “Invalid value for BulletPoint1” means a bullet point field is blank.
- “UPC code is not in proper format” means your GS1 UPC is missing digits or has spaces.
Here’s how you can fix these issues:
- Fix the flagged fields in Excel, re-save, and upload again.
- Repeat until the file processes successfully with no errors.
Once approved, your new ASIN will appear in Manage Inventory which is also fully verified against the GS1 database.
At this point, your catalog contains:
- The original ASIN (non-GS1 UPC).
- The new GS1 ASIN (compliant, but without reviews yet)
Now the next thing you need to do is Amazon merge listings so performance data carries over seamlessly.
Step 6: Request the Catalog Team to Merge Listings
As now the same product with two different UPC for Amazon listings are live, you’ll now merge them so that all reviews, rankings, and sales history remain under the GS1-compliant ASIN. Here are the steps you need to follow:
- Open Seller Support, navigate to “Catalog” and select “Merge Listings”.
- Provide both ASINs, clearly labeled:
- Old ASIN: non-GS1 barcode
- New ASIN: GS1-compliant barcode
- Attach evidence including product images showing identical packaging and both barcodes, your GS1 certificate or company-prefix invoice, and any brand-registry or purchase proofs confirming ownership.
- Use concise, professional phrasing such as:
“Please merge the GS1-compliant ASIN with the existing ASIN to retain reviews, rank, and sales history. Both listings represent the same product, now updated with a verified GS1 UPC.”
A point to note is that regular support agents can’t always perform merges that involve barcodes so politely request escalation to the Catalog Team. Mention that both listings are identical except for the product ID and that you’re updating per Amazon GS1 barcode policy. Follow up every 24–48 hours until you reach catalog escalation. Once the merge is approved, your old listing’s ranking signals, reviews, and metrics will transfer to the GS1 listing, preserving performance continuity.
Step 7: Confirm the Merged Listing Contains Both UPC Code for Amazon Listing
After Amazon confirms the merge of both UPC for Amazon listings, verify that everything is linked correctly. But remember that, merges may take several hours to reflect, so wait a bit before checking. Here’s what you exactly need to verify:
- Go to Manage Inventory and search for both ASINs. The old one should redirect to the new GS1 listing.
- In the Product ID column, ensure both barcodes are now associated:
- Your original non-GS1 UPC (for backward reference).
- Your new GS1-verified UPC (the compliant identifier).
- Open the Product Detail Page to confirm that:
- All reviews, ratings, and sales history are intact.
- Images and descriptions match the original.
- Pricing, inventory levels, and ad connections are unchanged.
- If you do not see both UPCs or if reviews are missing:
- Reopen the same case ID with Seller Support.
- Explain that the merge didn’t retain both identifiers and politely request re-evaluation.
- Attach before-and-after screenshots for faster resolution.
With persistence, Amazon’s Catalog Team can complete the merge properly so that your listing now reflects dual barcodes, the historical non-GS1 code and your new verified GS1 UPC.
This dual-record setup keeps your catalog compliant and preserves full sales continuity.
Step 8: Final Compliance Check
Once you have confirmed the Amazon merge listing, you are almost done with the process of changing Amazon listing barcodes from non-GS1 barcode to Amazon GS1 barcode. Now you need to run a final compliance check. Here’s what you need to see:
- Verify the GS1 UPC appears as the primary Product ID in Seller Central.
- Confirm your product still ranks for major search terms and remains fully indexed.
- Run an Amazon barcode lookup or check on GS1.org to confirm that your product is now registered under your company prefix.
- If using FBA, ensure your inbound labels display the GS1 barcode that matches this listing.
- Only once all data aligns should you delete the old SKU from inventory to prevent confusion or stranded stock.
Your product is now officially GS1-compliant, fully merged, and protected from suppression during Amazon’s ongoing barcode verification rollouts.
Alternate Methods if Amazon Doesn’t Allow Direct Change
In some cases, Amazon’s system may block your Amazon merge listings or update UPC for Amazon listing. This usually happens for older ASINs, brand-registered listings, or categories with stricter catalog controls (such as Health, Beauty, or Grocery).
When this happens, you’ll need to take alternative routes to ensure your listings comply with the Amazon GS1 barcode policy while keeping your rank and reviews intact.
Below are the four most reliable fallback methods used by experienced Amazon consultants and catalog teams:
Option 1: Request a Manual UPC Update from the Catalog Team
If the self-service merge request fails or is denied, the next best step is to open a manual case with Amazon’s Catalog Team. This option is ideal when both listings clearly represent the same product but Amazon’s automated system prevents merging due to conflicting identifiers.
Here’s how to do it:
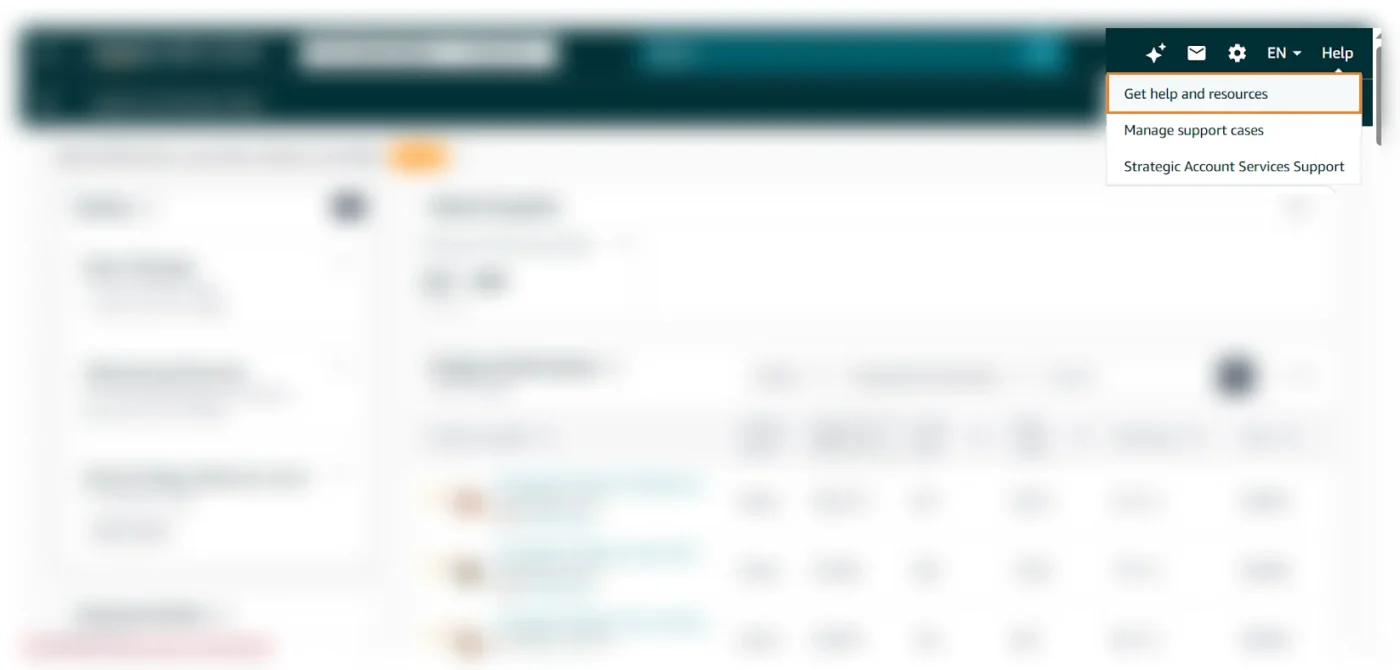
- Go to Seller Central, locate the “Help” and then select “Get Help and Resources”.
- Click on “My issue is not listed” at the bottom.
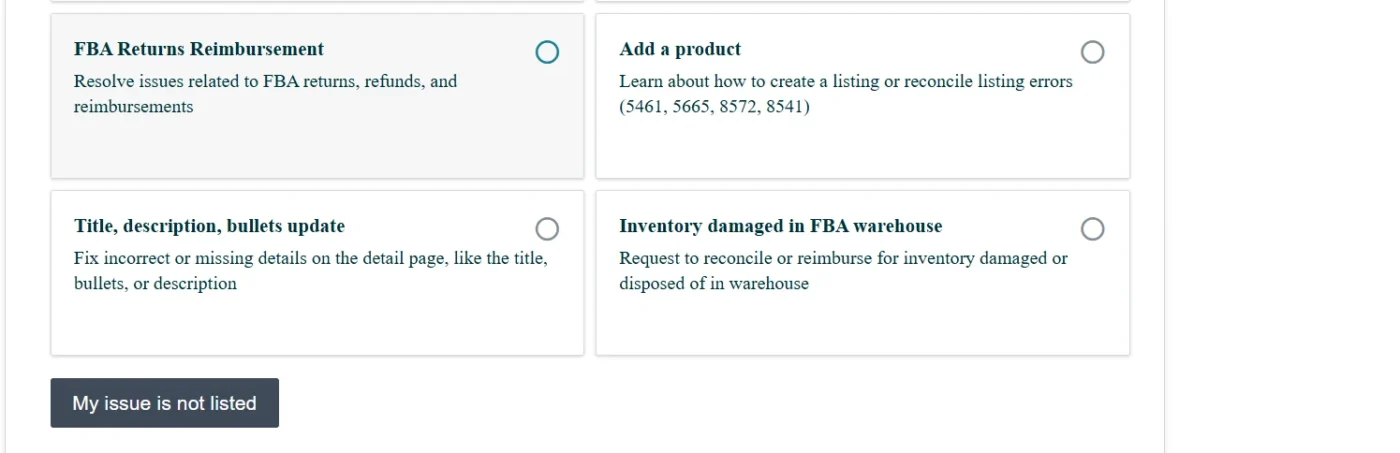
- Clearly explain that you are updating the product’s identifier to a GS1-verified barcode and attach the following documentation:
- A copy of your GS1 Certificate showing the company prefix.
- Product packaging images displaying both the old and new barcodes.
- A short message such as:
“This product is owned by our brand and is now updated with a GS1-verified UPC as per Amazon’s current catalog policy. Please manually update the Product ID to reflect the GS1 code.”

The Catalog Team can override system restrictions and manually replace the old Amazon UPC listing with your Amazon new UPC listing with GS1 barcode while keeping your existing ASIN intact. This process typically takes 3–5 business days, depending on case volume.
Option 2: Contact Brand Registry Support
If your brand is enrolled in Amazon Brand Registry, you have access to a faster and more direct escalation path. The Brand Support Team can intervene in catalog updates that normal Seller Support cannot resolve including product ID mismatches and GS1 enforcement errors.
Here’s what to do:
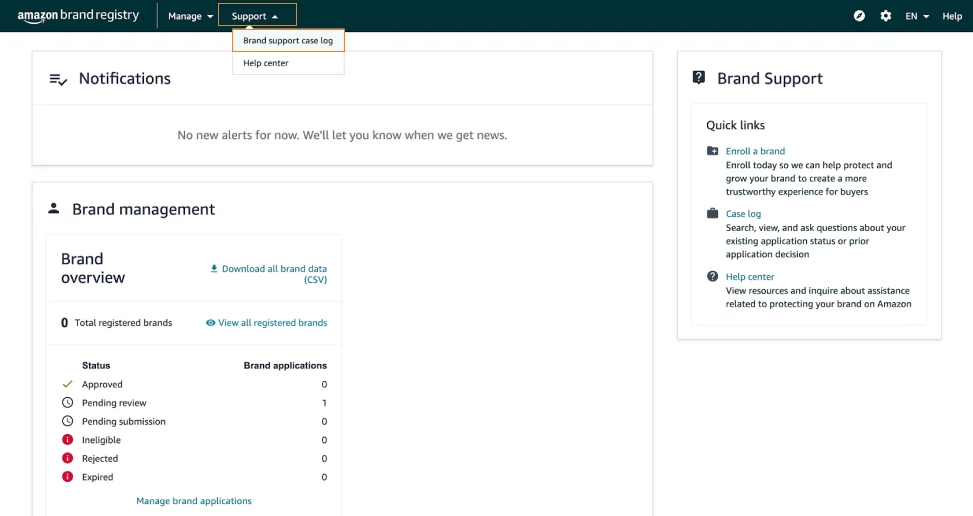
- Log in to Brand Registry, click on “Support” and select “Contact Brand Support” there.
- On the side panel at the left side, select “Report Technical Error”.
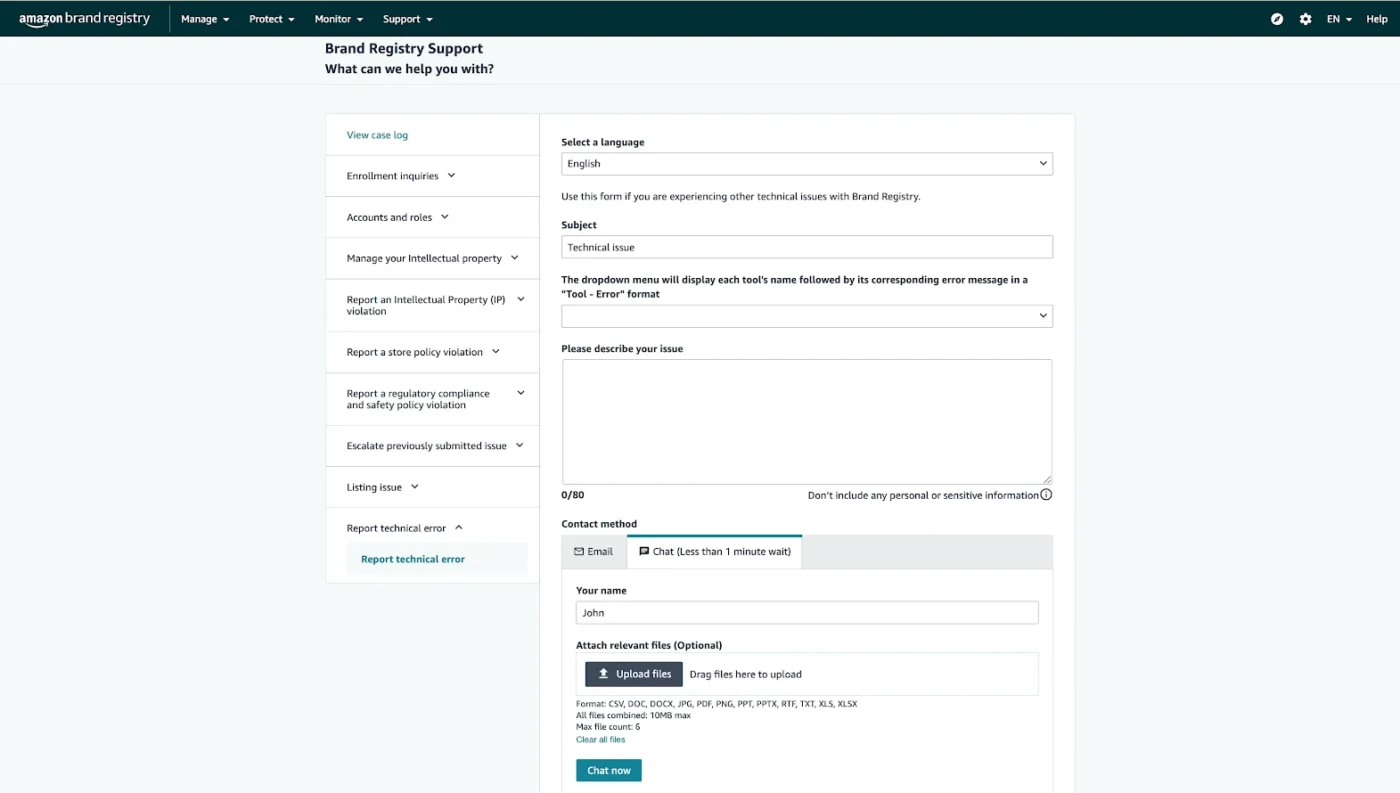
- Provide the affected ASINs, old and new UPCs. Include a message like:
“We are the registered brand owner and have updated this listing with a valid GS1 barcode as required by Amazon’s GS1 policy. Please assist in correcting the product ID and merging both listings.”
- Choose the contact method; whether you want the updates on chat or email.
- Click on “Upload Files” to attach your GS1 ownership certificate.
Since Brand Support has direct access to Amazon’s catalog, they can often process the update within 24–48 hours which is much faster than standard support channels.
Pro Tip: Always open these cases from the Brand Registry portal, not Seller Central. The system tags your request as a brand-authorized edit, which improves approval odds and response times.
Option 3: Delete and Recreate Listing Under the GS1 UPC
If none of the above methods work or if the listing has been repeatedly rejected for barcode conflicts, the final option is to delete the old listing entirely and relist it under your Amazon GS1 barcode.
While this is a more drastic step, it guarantees compliance and ensures that the new ASIN is cleanly tied to your brand’s GS1 record.
How to do it safely:
- Delete the old SKU from your inventory but do not delete the ASIN (this preserves catalog data).
- Wait 24–48 hours for Amazon’s system to clear the cached data and release the old UPC for Amazon listing.
- Recreate the listing using your new GS1 UPC, keeping all product content identical (title, bullets, images, and brand name).
- Once the new ASIN is live, open a merge request with Seller Support to combine it with the old ASIN and transfer reviews.
Although this approach requires patience, it ensures your product is completely aligned with Amazon GS1 barcode requirements, free of legacy data errors or non-compliant UPCs.
Documentation and Troubleshooting You Must Know for Amazon GS1 Barcode Compliance
Maintain complete documentation for audit and support cases:
- GS1 ownership certificate (PDF).
- Purchase invoices from GS1.
- Mapping spreadsheet (old vs new UPCs).
- Amazon case IDs and response threads.
If a merge request fails:
- Reopen the same case ID (don’t start a new one).
- Attach side-by-side screenshots comparing both ASINs.
- Re-include your GS1 certificate and product images.
- Request escalation to the Catalog Escalations Team.
- Keeping organized records significantly reduces resolution time.
5 Common Mistakes to Avoid
Avoid these common pitfalls that often lead to listing loss:
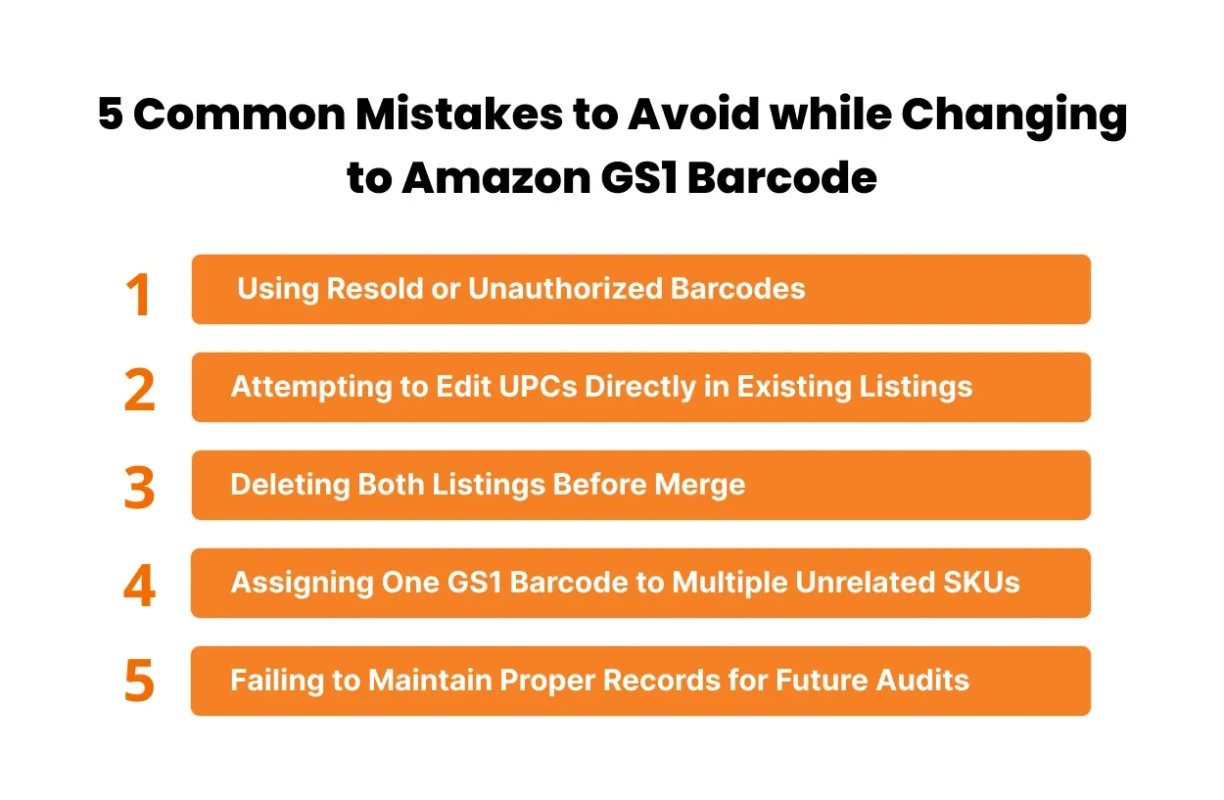
1. Using Resold or Unauthorized Barcodes
Avoid buying barcodes from cheap online resellers or third-party sites. Amazon’s system automatically cross-verifies all UPCs with the official GS1 database, and any barcode not registered under your brand prefix will be flagged as invalid which will potentially lead to listing suppression or deactivation.
2. Attempting to Edit UPCs Directly in Existing Listings
Never try to overwrite a UPC within an existing ASIN using the “Edit” function in Seller Central. Amazon’s catalog locks product identifiers to maintain data integrity, so these edits are rejected. Instead, always create a new listing with your Amazon GS1 barcode and request a catalog merge.
3. Deleting Both Listings Before Merge
Do not delete the old and new listings simultaneously. If both ASINs are removed before the Amazon merge listing request is approved, you’ll lose all reviews, rank, and historical sales data permanently. Only delete the non-GS1 listing after the merge has been successfully confirmed.
4. Assigning One GS1 Barcode to Multiple Unrelated SKUs
Each product variation such as color, size, or bundle must have its own unique GS1 UPC. Reusing a single barcode across different SKUs violates GS1 standards and confuses Amazon’s catalog mapping, which can lead to errors, listing removals, or brand mismatches.
5. Failing to Maintain Proper Records for Future Audits
Always store your GS1 ownership certificates, invoices, and mapping sheets securely. During compliance audits or catalog reviews, Amazon may request proof of barcode authenticity. Having these documents on hand ensures you can quickly verify ownership and prevent listing disruptions.
Following the official Amazon GS1 barcode requirements is the only reliable way to preserve catalog continuity.
Wrapping Up
Amazon’s GS1 enforcement is a permanent shift toward verified catalog authenticity. It’s recommended for the brands to transition as early as they can to avoid suppressed ASINs, maintain ranking stability, and future-proof your listings against counterfeit risks.
Other than that, adaptation to Amazon GS1 barcodes help you demonstrate professionalism, brand credibility, and compliance with global retail standards. Your listings stay active, your brand stays protected, and your catalog remains aligned with Amazon’s future direction. However, if you feel stuck at any stage, book a free consultation call and let the Amazon compliance experts at AMZDUDES help you resolve that issue promptly.
FAQs
Q1. Do I need a GS1 barcode to sell on Amazon?
Yes. Amazon now requires all products to have GS1-verified barcodes registered under your brand name.
Q2. Does Amazon require GS1 barcodes?
Yes. Amazon cross-checks every UPC with the official GS1 database to ensure authenticity and prevent counterfeit listings.
Q3. Can you merge Amazon listings?
Yes. You can merge identical listings by opening a case with Seller Support → Catalog → Merge Listings and providing both ASINs and proof of ownership.
Q4. How to add a UPC to an Amazon listing?
Use a flat-file upload in Seller Central. Enter your new GS1 UPC in the Product ID field and upload the file through Add Products via Upload.
Q5. What happens if I use non-GS1 barcodes?
Amazon may suppress or remove your listings if your UPCs don’t match the GS1 database. Always use barcodes purchased directly from GS1.org.